How does it work? Docker! Episode 3 - Swarm load balancing, service discovery and security
- 8 minsWhy Service Discovery?
Right, Service Discovery. From a previous article:
“...What if your application needs to advertise its own IP address to
a container that is hosted on another node? It doesn’t actually knows
its real IP, since his local IP is getting translated into another IP
and a port on the host machine. ”
That’s why.
The Docker Engine has an embedded DNS server within it, which is used by containers when Docker is not running in Swarm mode, and for tasks, when it is. It provides name resolution to all the containers that are on the host in bridge, overlay or MACVLAN networks. Each container forwards its queries to the Docker Engine, which in turn checks if the container or service is on the same network as the container that sent the request in the first place. If it is, it searches the IP (or virtual IP) address that matches a container, a task’s or a service’s name in its internal key-value store and returns it to the container that sent the request. Pretty cool, huh?
As I said before, the Docker Engine will only return an IP address if the matching resource is within the same network as the container that generated the request. What is also cool about this is that Docker Hosts only store the DNS entries that belong to networks in which the node has containers or tasks. This means that they will not store information that’s irrelevant to them practically, or that other containers do not need to know.

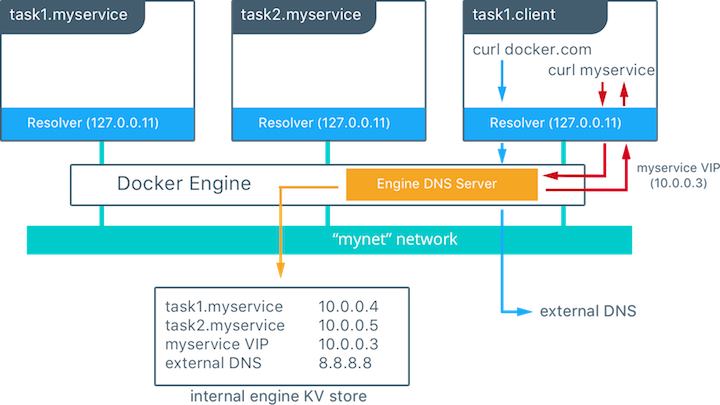
For example, in this image, there is a network called mynet. There are two services running on the network: myservice, and client. myservice has two tasks associated to it, whereas client only has one.
Client then executes a curl request to myservice, and therefore, it also does a DNS request. The container built-in Resolver forwards the query to the Docker Engine’s DNS server. The request to myservice is then resolved to the 10.0.0.3 virtual IP. This information is then forwarded back to client.
What if client requests something that’s not in the internal key-value store? For example, if client does a curl request for the sebiwi.github.io domain, the same flow will the triggered. The DNS query is forwarded by the resolver to the DNS server. Since the sebiwi.github.io name is not present in the key-value store (which in turn means that it is not a service within the network), the Docker Engine will forward the request to its default configured DNS server.
This methodology seems quite logical and simple, but it is only possible due to the existence of a key-value store integrated with the Docker Engine.
And Load Balancing?
Yeah, there’s native load balancing too! There are basically two types of load balancing: internal and external. Internal is all about load balancing requests that are made from within the Swarm cluster (from other containers), whereas external load balancing targets ingress traffic that enters a cluster. Both of these functionalities are provided by the Docker Engine itself.
Let’s talk about internal first. This feature is automatically enabled once a Service is created. So when a Service is created, it get a virtual IP address right away, on the Service’s network. As we said before in the Service Discovery part, when a Service is requested the resulting DNS query is forwarded to the Docker Engine, which in turn returns the IP of the service, a virtual IP. Traffic sent to that virtual IP is load balanced to all of the healthy containers of that service on the network. All the load balancing is done by Docker, since only one entry-point is given to the client (one IP).
Things change slightly when doing external load balancing. First of all, the load balancing is not activated by default, but rather when you expose a service using the –publish flag at creation or update time. When this happens, every node in the cluster starts listening on the published port. This means that every node can respond to a request for the service mapped onto that port.
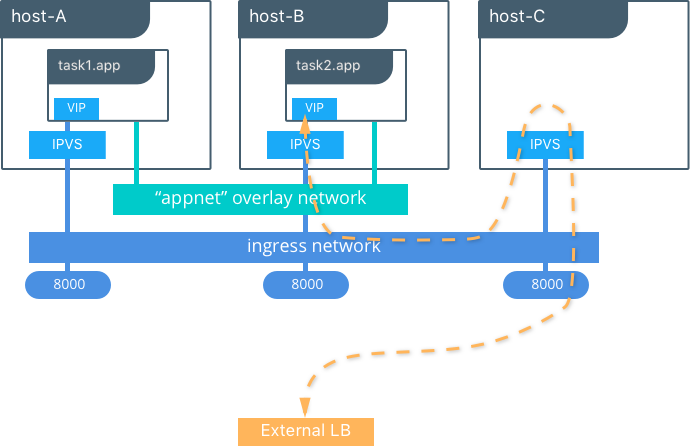
What is really interesting is what happens when a node receives a request, but it does not have an instance of the container within it. Since Docker 1.12 (same version that integrated Swarm Mode to the Docker Engine), there is a feature called Routing Mesh, which uses IP Virtual Servers (ipvs) and iptables in order to load balance requests in layer 4. Basically, ipvs implements layer 4 load balancing functionalities on the Linux Kernel, which allows to redirect requests for TCP/UDP-based services to the real backends (containers in this case). In Swarm’s specific case, every node listens on the exposed port, and then forwards the request to the exposed service’s VIP, using a special overlay network called ingress. This overlay network is only used when transporting external traffic to the requested services. In this scope, the same internal load balancing strategies described in the previous section are used.

In this picture, a service is created with two replicas, on the appnet overlay network. We can see that the service is exposed on port 8000 on the three nodes. This is great, because traffic destined for app can be forwarded to any node. In this case, there is an external load balancer, that just happens to forward the request to the only node that does not have an instance of the service. This request is handled and forwarded by the IPVS on the third node, which redirects it to one of the actual containers on the cluster for that service, using the ingress network and therefore the aforementioned method of load balancing. Neat.
Just for the record, when using Docker Enterprise Edition’s Universal Control Plane, this Routing Mesh is also capable of routing layer 7 traffic, by inspecting the HTTP header of requests, therefore operating at an application level. This is actually another feature of Docker Swarm, called HTTP Routing Mesh, or HRM, which allows each created service to be accessed through a DNS label. When using HRM, the normal Routing Mesh is used as well. Every HTTP/1.1 TCP request contains a Host Header. At service creation time, the desired label must be specified. When a service is created using the io.github.sebiwi.ucp.mesh.http label, the HRM routes all requests with the Host field specified in the previously defined label to the VIP of the service. This enables direct access to the service under the form of a hostname, so theoretically it is the simplest way to expose your service to the internet. You won’t need an external load balancer in order to forward traffic to the right port at ingress. That’s pretty cool.
Where’s the security though?
Security is implemented by means of isolation and encryption.
The isolation part works as follows: every network is segmented from each other to prevent all traffic between them. This provides actual layer 3 separation. The Docker Engine also manages host firewall rules which prevent access between different networks and which also manage ports for containers. Since all of this is managed by the Docker Engine itself, it changes dynamically according to tasks, services and networks that are created inside of the cluster. Traffic generated from inside containers to outside networks is allowed, and so are responses generated from this traffic. Ingress traffic is denied by default, and is only accepted through exposing service on ports, using the previously described methods.
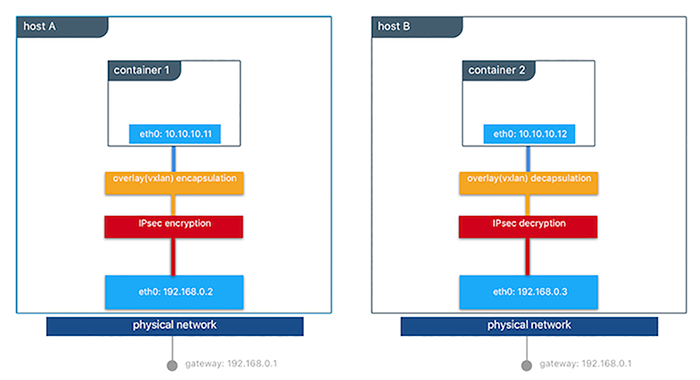
Let us talk about encryption. All the control plane traffic between nodes is secured through TLS. All managers and nodes have signed certificates in them, which are created automatically by Swarm and are rotated automatically as well. For data plane traffic, all traffic is encrypted using IPSec tunnels when leaving the source container, and it is decrypted once it arrives to the destination container. This guarantees security even when you do not fully control the underlying network infrastructure.

In the picture, when container 1 sends traffic to container 2, everything is encrypted on the way out, and then it is decrypted once it arrives to host B, before entering the destination container. The Swarm leader periodically regenerates symmetric keys for IPSec, and it distributes them to all the cluster nodes.
Docker Enterprise Edition’s Universal Control Plane also has advanced security options, like role based access control, for example. I won’t discuss these further, since I haven’t actually tried them myself.
Anyways, that’s all for today. Next time, we will start coding stuff! Stick around, we’ll be right back!
