How does it work? Kubernetes! Episode 5 - Master and worker, at last!
- 15 minsLet’s install our Master node!
Absolutely.
So basically, we need to create an API server, a Scheduler, and a Controller Manager Server on the Master node.
First, we’ll add the TLS resources needed for the master node. That means the CA certificate and the API server certificate and key. Nothing complicated about that.
Next up, networking. For this we’ll use Flannel and Calico.
In order to configure Flannel, we just add configuration environment variables under /etc/flannel/options.env. These specify that the flannel interface is this node’s public IP, and that the cluster configuration is stocked in etcd cluster:
FLANNELD_IFACE={{ ansible_env.COREOS_PUBLIC_IPV4 }}
FLANNELD_ETCD_ENDPOINTS={{ etcd_endpoints }}
Then, we add a system-drop in (a method for adding or overriding parameters of a systemd unit) for flannel, in which we specify that we want to use the configuration specified above when the service launches:
[Service]
ExecStartPre=/usr/bin/ln -sf /etc/flannel/options.env /run/flannel/options.env
System drop-ins are pretty cool because they only modify the specific settings you modified, and everything else stays the same.
The flannel configuration is actually stored in etcd. We create it under the coreos.com/network/config namespace using a simple uri task.
After that, we gotta configure Docker on the virtual machine. Actually, the only thing we need is to be sure that flannel is used for networking. Basically, flanneld needs to be running when Docker starts:
[Unit]
Requires=flanneld.service
After=flanneld.service
Now that the basic requirements are configured, we’re going to configure a whole set of components that are necessary in order to run a Kubernetes cluster: the kubelet, the Kubernetes Proxy, the Controller manager, and the Scheduler. With the exception of the kubelet, all the other components will be deployed in a container form. This is why I said in the first article that the Master node actually does run some containers. How cool is that?
First up, the kubelet. This is the agent on the node that actually starts and stops containers, and communicates with the Docker engine at a host level. It is present on every node in a Kubernetes cluster: both master and worker nodes. It talks with the API server using the certificates we created earlier. The kubelet does not manage containers that are not created by Kubernetes. The master node configuration of the kubelet does not register for cluster work (since it is a master and not a worker).
The kubelet may use different standards for networking. One of these standards is the Container Network Interface, or CNI. The CNI is a set of specifications and libraries for writing plugins to configure network interfaces in Linux containers. The only concern of CNI is network connectivity of these containers, and then removing allocated resources when the containers are deleted.
So when using Calico, the kubelet uses CNI for networking. Calico is aware of each pod that is created, and it allows them into the flannel SDN. Both flannel and Calico communicate using CNI interfaces to ensure that the correct IP range is used for each node.
The kubelet configuration can be seen here. As of this moment configuration files start to get really verbose so I’ll just mention the most important parts. This one specifies the address of the API server, the network plugin to use, the DNS service address and general kubelet configuration, like log files location and configuration directories. The configuration also creates a “manifests” directory, and watches it. This means that for every Pod manifest that is stored in that location, a matching Pod will be created by the kubelet, just as if the Pod was submitted via the API. We will take advantage of this functionality extensively from now on.
After that, we gotta set up the API server. This stateless server takes in requests, process them and stores the result in etcd. It’s one of the main components of the Kubernetes cluster. What we would normally do in order to create a server of this kind is to send a request to the API server, with the Pod manifest of the Pod we want to create. But we don’t have an API server yet. Huh.
We’re going to use the manifest directory that we mentioned on the previous paragraph. When we place the API server manifest inside of the “manifests” directory, it will be automatically created as soon as the kubelet is launched. Pretty neat, huh? We’re going to use this same strategy for the Proxy, the Controller manager and the Scheduler.
The API server configuration is pretty long and might be confusing at first. Between many other things, it needs to:
- Be accessible on the host machine address
- Be able to access etcd
- Be aware of the service range we’re going to use for service IPs
- Access the SSL certificates we created earlier
And so on. If you want to take a look at the configuration, the template is right here.
Then, there’s the Kube Proxy. It redirects traffic directed to specific services and pods to their destination. It talks to the API server frequently. In this case, it is used in order to access the API server from the outside. It’s configuration can be found here.
Let’s take on the Controller manager. This component basically applies the necessary changes based on the Replication Controllers. When you increase or decrease the replica count of a pod, it sends a scale up/down event to the API server, and then new containers are scheduled by the Scheduler. It’s configuration can be found here.
Last but not least, we need to add the Scheduler configuration. This component watches the API for unscheduled Pods, then he finds a machine for them to run and informs the API server of the best choice.
We haven’t configured Calico yet, have we? Let’s add it as a service. We will create the “/etc/systemd/system/calico-node.service” file. It’s configuration can be found here. Basically, it talks with etcd in order to store information. Now every container launched will be able to connect itself to the flannel network with its own IP address, and policies created using the policy API will be enforced. Calico also needs a policy-controller in order to work. This component will watch the API and look for changes in the network policy, in order to implement them on Calico. It’s configuration can be found here.
Finally, (yes, this time it’s true) the kubelet service configuration specified a cni configuration file we need to create. This file specifies which CNI plugin needs to be called on startup. This creates the flannel plugin, but then delegates control to the Calico plugin. This might sound convoluted at first, but it is actually done so that Calico knows which IP range to use (which is determined before by flannel). It’s a pretty short configuration so I’ll just put it here:
{
    "name": "calico",
    "type": "flannel",
    "delegate": {
        "type": "calico",
        "etcd_endpoints": "{{ etcd_endpoints }}",
        "log_level": "none",
        "log_level_stderr": "info",
        "hostname": "{{ ansible_env.COREOS_PUBLIC_IPV4 }}",
        "policy": {
            "type": "k8s",
            "k8s_api_root": "http://127.0.0.1:8080/api/v1/"
        }
    }
}
After that, we’ll just start the services and cross our fingers (don’t worry, it will work).
You can see that this role actually has another yaml file embedded into the main.yml file. It is called namespaces.yml. It is included because we need to create a Kubernetes namespace for the Calico policy-controller to run (we specified that here). And that needs to be done after the API server starts responding, since it is a Kubernetes functionality. So we just create the calico-system namespace if it doesn’t exist already.
By the way, this Master node is not highly available. In order for to have high availability on the Master node, I would need to add a component in order to manage the virtual IP of the master node, like keepalived, or to handle it with fleet. I might do something about this in the future.
That’s all for the master node configuration. We should have a master Kubernetes node running alive and well by now. Are you tired? There’s still more!
Kubernetes worker node
The master node does not run any containers, it just handles and manages the cluster. The nodes that actually run the containers are the worker nodes. We’re going to configure two of them.
We’ll just start by configuring the SSL resources the same way we did it on the Master node. Nothing new here. The code just puts them under the “/etc/kubernetes/ssl” directory. Moving on.
Network-wise, we’ll use flannel the same way we did on the Master node. I didn’t create a flannel role because I figured that the flannel configuration might change from Master to Worker in the next Kubernetes release (turns out it did with 1.5!). Same with the Docker configuration. We just want flannel to be running before we run Docker.
Next up, the kubelet. We will not disable the register for cluster work flag, since we want for these nodes to do the heavy lifting. We will also configure it to talk to the master node, to use the CNI network plugin, the specified DNS server, and its own advertising IP. Here’s the configuration if you want to check it out.
We’re going to tell the kubelet to call flannel as a CNI plugin, and then to delegate the control to Calico, the same way we did it on the master node. We’ll need to specify the master node’s IP on the configuration here instead of localhost, since the the configuration needs to access the API server. The configuration template can be seen here.
As we said before, there’s a kube-proxy instance in each node. That means there’s one on the worker nodes too. It’s configuration specifies the master nod. Nothing fancy. It’s configuration can be found here.
We’re going to add a kube-config configuration, in order to specify the TLS resources that are necessary for secure communication between the different Kubernetes components. It can be seen here.
Finally, we need a Calico Node Container too, that will fulfil the same role it did on the Master node. It’s configuration can be found here. After that, we start every service, and we should have our full Kubernetes up and running. It might take a while, depending on your internet connection.
Let’s recap for a second. What just happened?
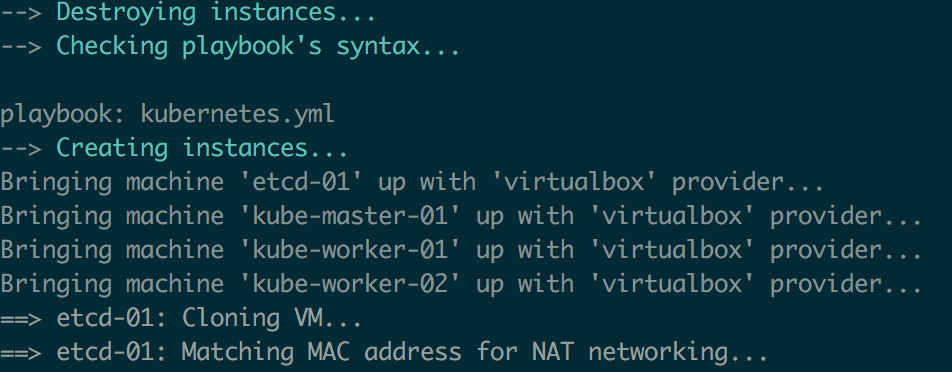
We created one etcd node (if you didn’t touch the defaults), then we spawned one Kubernetes master node that uses the etcd cluster to persist the cluster state, and two Kubernetes worker nodes that can host container workloads. Yay!
We still need a way of interacting with the cluster. For that we’ll use the standard Kubernetes management tool, kubectl.
Configuring kubectl
You can download kubectl and put it wherever you want in your computer. Try to add it to a directory that’s in your PATH, so that you don’t have to reference the whole path every time you do a kubectl action. Make sure it is executable, too.
After that you can configure it by specifying the certificates and the Master host’s URL:
- name: Verify if kubectl is already configured
  command: kubectl cluster-info
  register: cluster_info
  failed_when: false
  changed_when: false

- name: Set default cluster
  command: kubectl config set-cluster default-cluster --server=https://{{ master_host }} --certificate-authority=ca.pem
  args:
    chdir: "{{ kube_resource_dir }}/ca"
  when: "'Kubernetes master' not in cluster_info.stdout"

- name: Set credentials
  command: kubectl config set-credentials default-admin --certificate-authority=ca.pem --client-key=admin-key.pem --client-certificate=admin.pem
  args:
    chdir: "{{ kube_resource_dir }}/ca"
  when: "'Kubernetes master' not in cluster_info.stdout"

- name: Set context
  command: kubectl config set-context default-system --cluster=default-cluster --user=default-admin
  args:
    chdir: "{{ kube_resource_dir }}/ca"
  when: "'Kubernetes master' not in cluster_info.stdout"

- name: Use context
  command: kubectl config use-context default-system
  args:
    chdir: "{{ kube_resource_dir }}/ca"
when: "'Kubernetes master' not in cluster_info.stdout"This configuration is only applied when the cluster is not configured, though. That way, we keep our idempotence neat and clean.
That was easy, kinda. Now what? Oh yeah, cool stuff on our cluster.
Add-ons
Add-ons are… well… things you add-on to your Kubernetes cluster in order to have improved functionality. They are created using Kuberntetes native resources. Most of the time they will be pods, so we can juste create a manifest for them and then create them using the API server (through kubectl).
There are two add-ons that are commonly used on almost every standard Kubernetes installation: the DNS add-on, and the Kubernetes Dashboard add-on.
The first enables service discovery for your containers. They can have a DNS name, and they can be reached by other containers with it. The manifest is huge. It’s because we’re creating a Service, which provides DNS lookups over port 53 to every resource that demands it, and also a replication controller, which makes sure that there is one replica of the pod at all times. The configuration can be seen here.
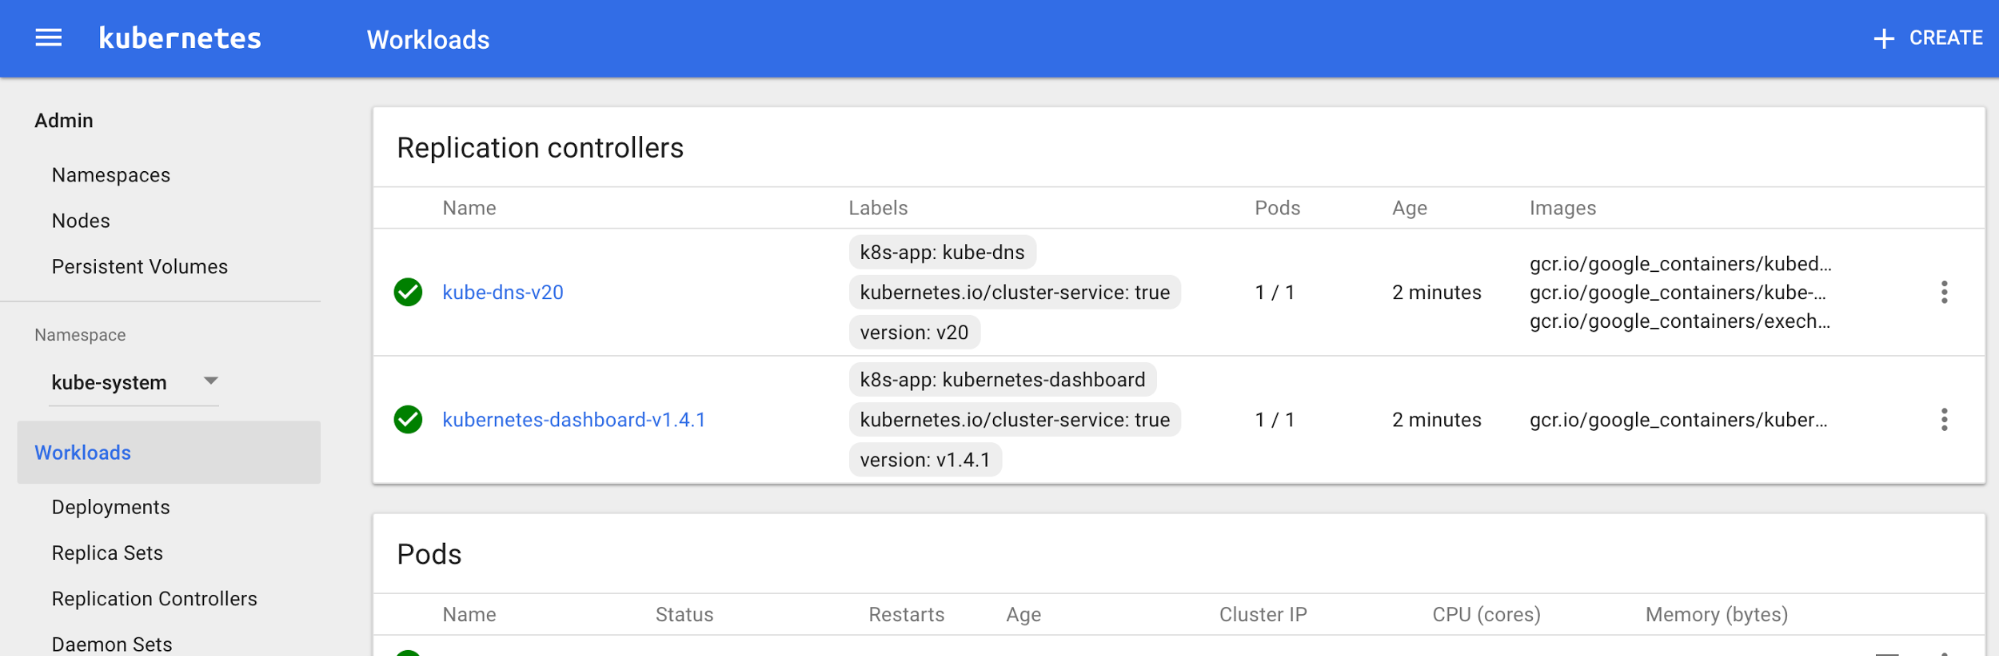
The Dashboard allows you to see general information about your cluster. That means Pods, Services, Replication Controllers, and all that under different namespaces. It’s a pretty cool tool, honestly. We’ll create a Service and a Replication Controller for it too.
You can access the Kubernetes Dashboard by using the port forwarding functionality of kubectl:
kubectl get pods --namespace=kube-system
kubectl port-forward kubernetes-dashboard-v.1.4.1-ID 9090 --namespace=kube-sytem
And now, your Kubernetes Dashboard should be accessible on port 9090.
Woot! Almost done. Now we only need to test that it works, and that our code is working as intended.
So, molecule test says that:
Our infrastructure is created without any hiccups.
The playbook runs as intended.
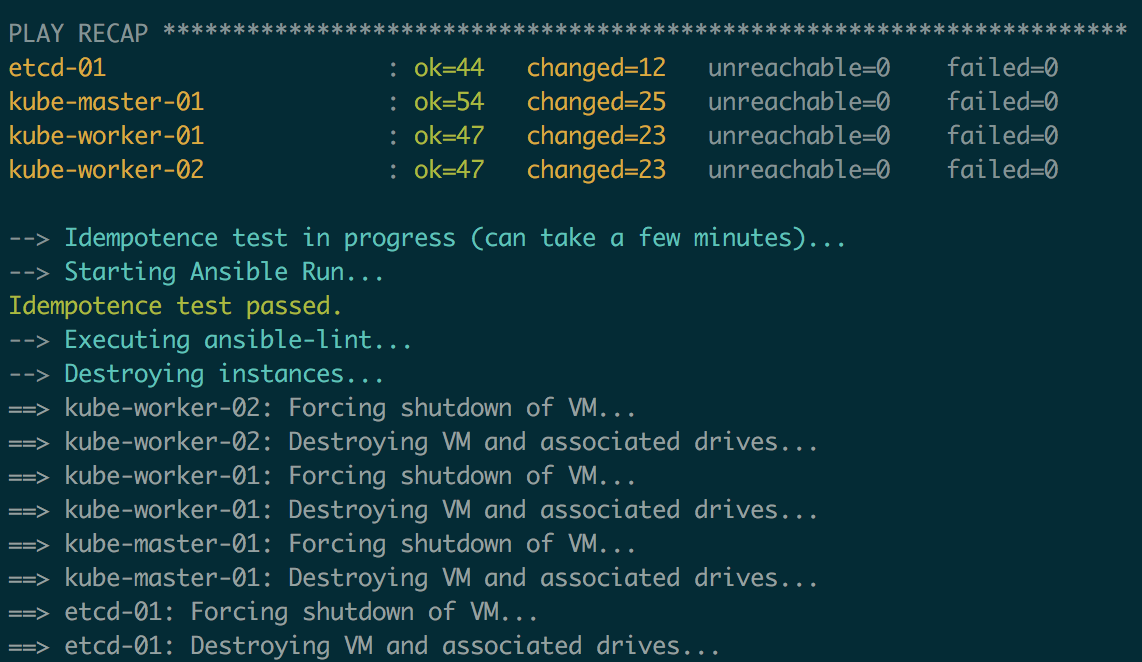
And that our code is properly linted, and it is idempotent as well!
Let’s have some fun with our cluster now.
Sample app
We’re going to use the guestbook example that’s included on the Kubernetes samples. This is a good application to test a proper installation, since it’s a multi-tier application, with multiple components speaking to each other, on different nodes.
The guestbook application is created under the kubernetes-resources directory. It can be launched using kubectl:
kubectl create -f guestbook.yml
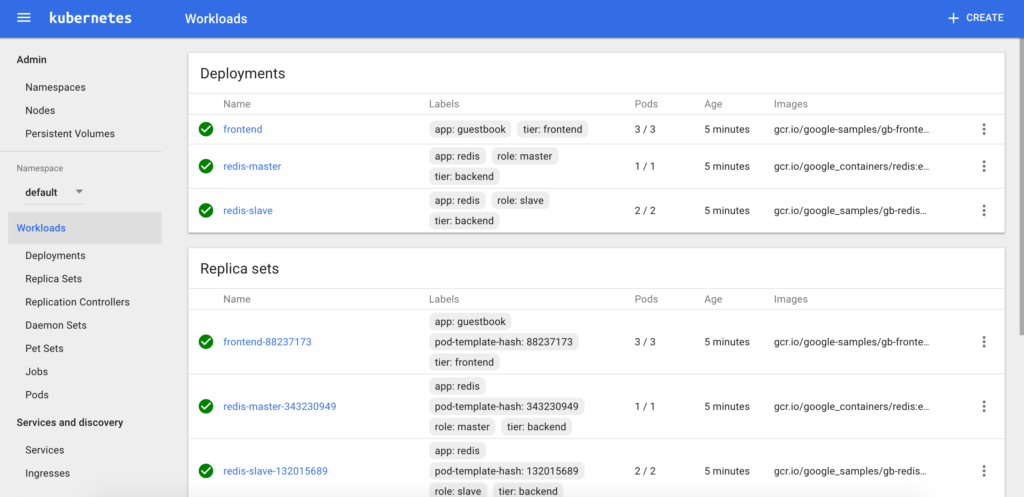
We can see that the resources are properly created on the Dashboard:
And then we can even test the application by port-forwarding to the frontend application:
kubectl get pods
kubectl port-forward frontend-ID 8080:80
The application should be accessible on port 8080. You can test it by adding a message to the guestbook:
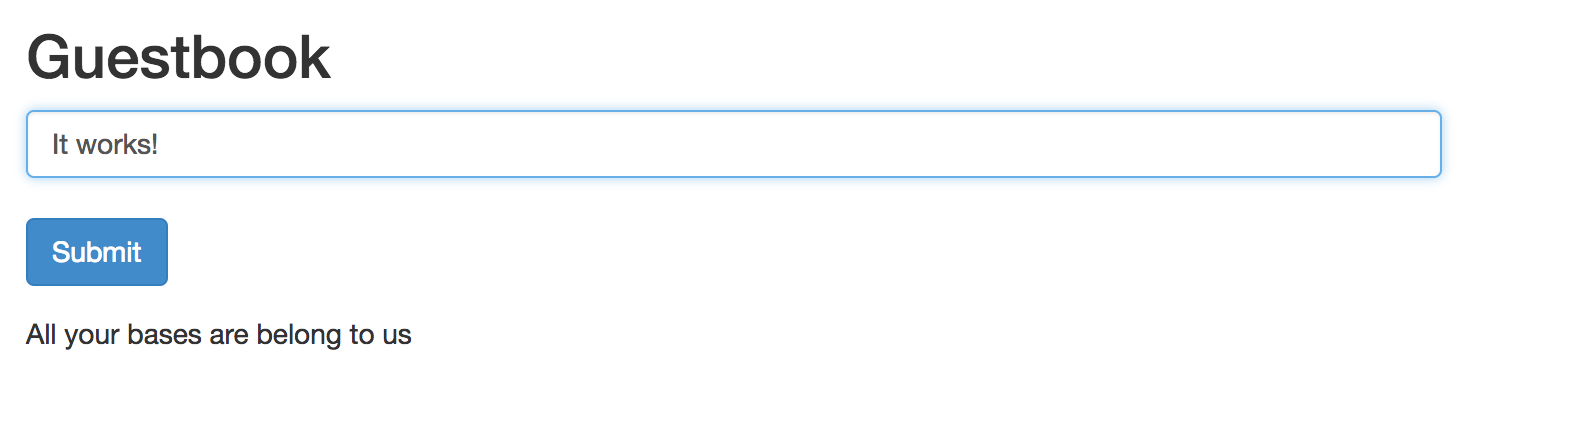
Great. It works. Mission accomplished!
So what did we learn in the end?
- CoreOS (Container Linux) is a lightweight Linux distribution that runs almost everything inside of containers
- An “Ansible” is a fictional device capable of instantaneous or superluminal communication. It is also a pretty powerful IT automation tool.
- You can move around on remote hosts using Ansible, even when you don’t have Python installed on them
- etcd is a distributed key-value store, which is used as the standard distributed storage by Kubernetes
- Flannel and Calico can be used together to provide SDN-based connectivity and network policies for containers located on different hosts
- You can use Molecule to continuously test important aspects of your Ansible code
- The egg came before the chicken
Final thoughts
Phew, yeah, that was kinda long. Anyways, I hope you had fun. I know I did. Still, I would have loved to work on some other things too:
- Use etcd3 instead of etcd2
- Install Python “The CoreOS way”. The PyPy installation works, but it feels kinda hacky. I’d have loved to run Python from inside a container and provision the host with Ansible somehow
- Use SSL on the etcd cluster
- Use fleet for certain tasks, like deploying unit files, or handling the Master node high availability
I might work on these things in the future. Anyways, see you on the next adventure!

Sebiwi
Perfectionist